


Welcome To Hawkrown Professional
Are You Visiting As A Business Buyer (wholesaler/retailer) Or A Homeowner?
Business Buyer
Continue Here >Homeowner
Shop Retail Store >
Home / Blog Center / Chargers / How to Properly Install Tiles Around Shower Drain Grooves
18/07/2025 | Hawkrown
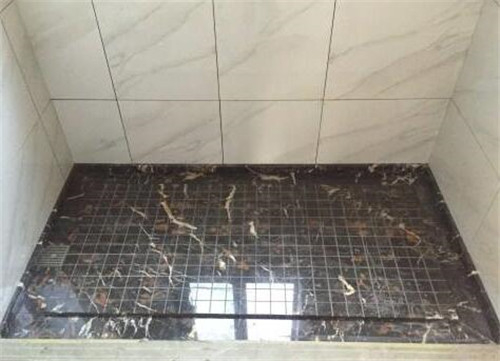
For domestic enhancement, the stylistic layout of the shower room is especially imperative. Opening seepage floor tiles are progressively prevalent due to their one of a kind waste plan and stylish offer. The rectify establishment strategy can not as it were upgrade the generally magnificence of the shower room but moreover viably avoid water spillage. This article will give a point by point clarification of how to introduce opening seepage floor tiles in a shower room, making a difference you total this errand with ease.
1. Planning Work
Before you start establishment, it is fundamental to make exhaustive arrangements. Guarantee that the floor is clean and level, evacuating any flotsam and jetsam and clean. For uneven floors, utilize cement mortar to level them. On this premise, get ready the opening seepage tiles and cement materials in progress to guarantee that all vital materials are ready.
2. Fabric Selection
When choosing opening seepage tiles, pay consideration to their anti-slip properties and water resistance. High-quality space waste tiles not as it were improve security but too viably decrease the chance of water entrance. Furthermore, guarantee the quality of the cement and grout, selecting for items reasonable for sticky situations to altogether progress the establishment effectiveness.
3. Estimation and Layout
Before genuine establishment, precisely degree the measurements of the shower room and make a point by point format. This step is pivotal for the ensuing tile establishment. You can utilize a chalk line or a laser level to stamp reference lines, guaranteeing symmetry and stylish offer amid the establishment process.
4. Cement Application and Tile Laying
Once the format is affirmed, utilize a trowel to equally apply the cement to the floor and continue to lay the tiles in areas. Pay consideration to adjusting the tile joints and keeping up steady dividing. Particularly in the space waste ranges, make beyond any doubt the tiles move actually to accomplish ideal drainage.

5. Grouting and Cleaning
After the tiles are introduced, hold up for a period to permit the cement to set some time recently continuing with grouting. Select a water-resistant grout to guarantee that the crevices are well-sealed to avoid water entrance. At last, utilize a soggy wipe to clean the surface of the tiles, guaranteeing that no abundance grout remains, in this way improving the stylish impact of the installation.
6. Review and Maintenance
After the establishment is total, keep in mind to conduct a exhaustive assessment to guarantee all tiles are laid equitably and the crevices are uniform. Perform a basic waste test utilizing water to guarantee smooth waste. For future support, frequently clean the shower room to avoid the buildup of scale and stains, which can successfully drag out the life expectancy of the opening seepage tiles.
By taking after these steps, you can effectively total the establishment of space waste floor tiles in your shower room. With cautious consideration to detail, you can make a wonderful and utilitarian shower space. We trust these tips will help you and make the remodel handle smoother.
Are You Visiting As A Business Buyer (wholesaler/retailer) Or A Homeowner?
Business Buyer
Continue Here >Homeowner
Shop Retail Store >